How to Draw Plan to Put Up a Shed 4x6
How to Build a Shed on the Cheap
Buy This PDF & Cutting Listing
We designed this shed with money saving in listen. Even the dimensions are designed to make the most efficient use of lumber.
Introduction
Modular construction and inexpensive materials make this shed like shooting fish in a barrel to build and like shooting fish in a barrel to afford. Nosotros'll prove you how to build this shed and provide you lot with the plans and materials list you need to become started. Don't be intimidated by the size of this projection. Nosotros use simple construction methods to make the building process every bit easy as possible.
Tools Required
Materials Required
- one-1/2-in. trim piece
- 1/four-in. acrylic sheet
- 16d nails
- 1x6 x 8 ft.
- 2×x x 8 ft.
- 2x4 x eight ft.
- 2x6 x 8 ft.
- iii-in. screws
- 4x6 x 8 ft.
- 4x8 ft. grooved plywood
- 6d galvanized box nails
- 6x6 x 8 ft.
- Caulk
- Blended trim
- Fiberglass shingles
- Gravel
- Hinges
- Metallic Z-flashing
- OSB siding
- Soffits (nosotros used 12-in. cobweb cement siding for soffit material)
- Treated 3/4-in. plywood
- Two layers of iii/4-in. boards
Projection step-by-step (21)
Step 1
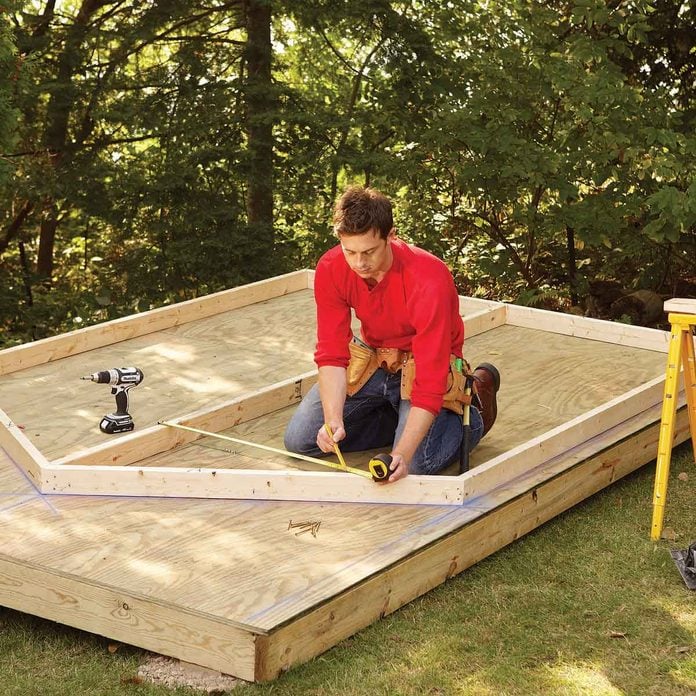
Build the Foundation
- Dig two trenches 16 in. broad, 12 in. deep and 13 ft. long.
- Heart the trenches 66 in. apart.
- Fill the trenches with a three-in. layer of gravel and compact information technology with a hand tamper.
- Repeat this procedure until the trench is full.
- Cutting the treated 6x6s to 12 ft. and set them on the gravel so they're parallel and the outside edges are 6 ft. apart.
- Pro tip: On sloped ground, you'll have to raise the 6x6 on the low side until it's level with the adjacent 6x6. Exercise this by stacking treated 2x6s, 4x6s or 6x6s on top of the treated 6x6 to attain the right tiptop.
- Comprehend it with treated iii/4-in. plywood (Effigy B).
Step 2
Assemble the End Walls
- Offset past nailing together the perimeter and adding the center stud.
- Then measure from the center stud to mark for the remaining studs.
- You can build the walls on whatsoever flat surface, only the shed platform is ideal. Use chalk lines equally a guide.
![]()
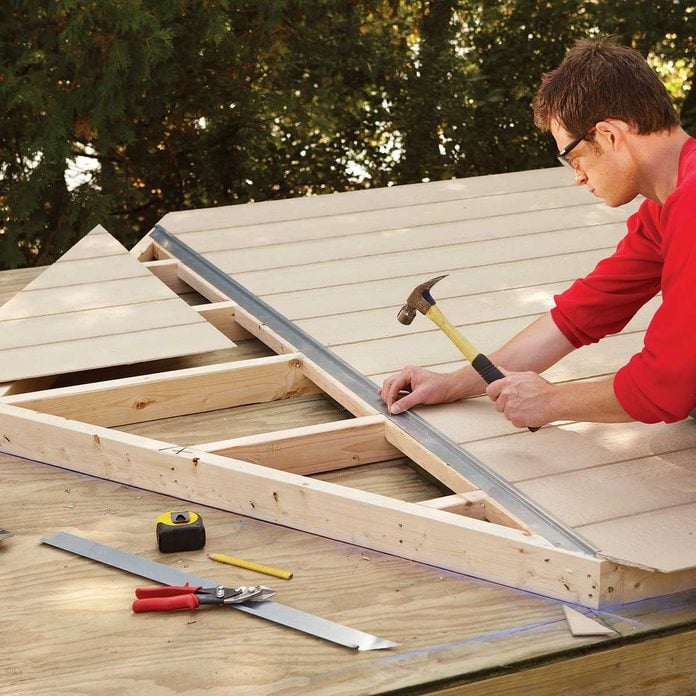
Footstep iii
Attach Flashing Over the Siding Seam
- Nail siding to the walls before y'all stand them up.
- Cover the horizontal seam with metal Z-flashing to keep out h2o.
Footstep 4
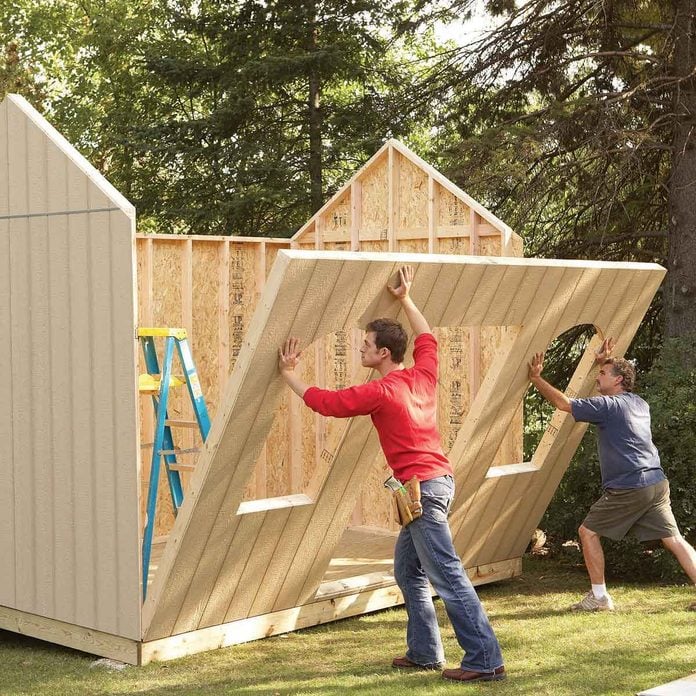
Side the Walls
- Screw the front end wall to the platform to concord it square while y'all add together the siding. Align the bottom plate with a chalk line to make sure it'south directly.
- Snap chalk lines on the plywood deck, three-1/2 in. from the edges of the platform, to indicate the inside edge of the walls. Measure to make sure the lines are parallel and 89 in. apart. So chalk a line downwardly the eye. You'll use this line to make sure the angled top plates meet in the center.
- Snap lines for the peak.
- Cut 2x4s to fit inside the lines and toe-spiral them to the plywood to hold them in place while you fill in the center studs and nail on the siding.
- Toe-screw from the outside so the screws will be attainable after the siding is installed.
- Blast on the siding so that it overhangs the framing on each side by iii-i/ii in.
- Trim off the top corner to follow the slope of the angled top plate.
- When you're washed edifice the front and dorsum walls, gear up them aside so you tin use the platform to build the roof sections.
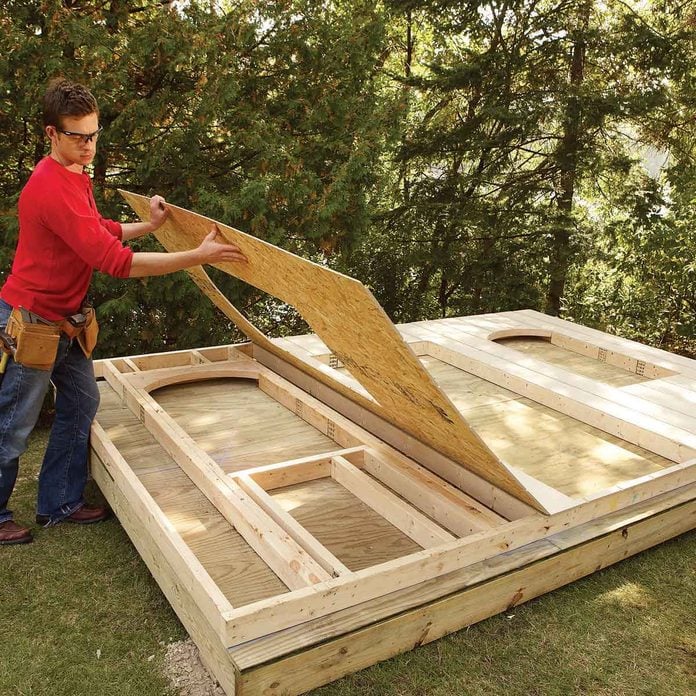
Step v
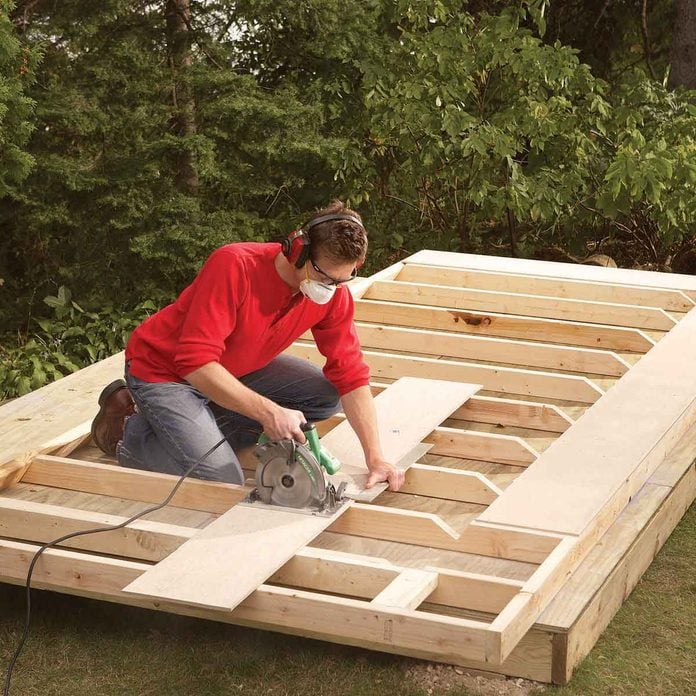
Build the Roof Frame
- Beginning past cut out the rafters using the blueprint in Figure D as a guide.
- Omit the bird's-mouth from iv rafters and use these on the ends.
- Cutting the 2x4s for the ridge and subfascia to length and marker the rafter positions on them.
- Line up the rafters with the marks and nail through the ridge and subfascia with 16d nails to secure them.
Step six
Install the Soffits
- Line up the subfascia with the chalk line on the platform. Tack information technology in three or iv places with toe screws to hold the frame straight while you install the soffit.
- Pro tip: Add the soffit to the roof frame while it's on the platform. That volition save yous the hassle of upside-down nailing in a confined spot.
- Boom the soffit to the roof frame with 6d galvanized box nails.
- We used 12-in.-wide fiber cement siding for soffit material.
- Mount an inexpensive carbide blade on your circular saw to cut the fiber cement.
- Set the roof panel aside and build the other half of the roof using the same techniques.
Step 7
Stand up and Nail the Walls in Place
- Stand the walls, starting with the back wall.
- Add the sides and the front.
- Boom each wall to the platform as you go and lock the corners together past nailing through the overhanging siding into studs.
- Line up the bottom plate with the chalk line and drive a few iii-in. screws or 16d nails through the plate to hold the bottom of the wall in position.
Step viii
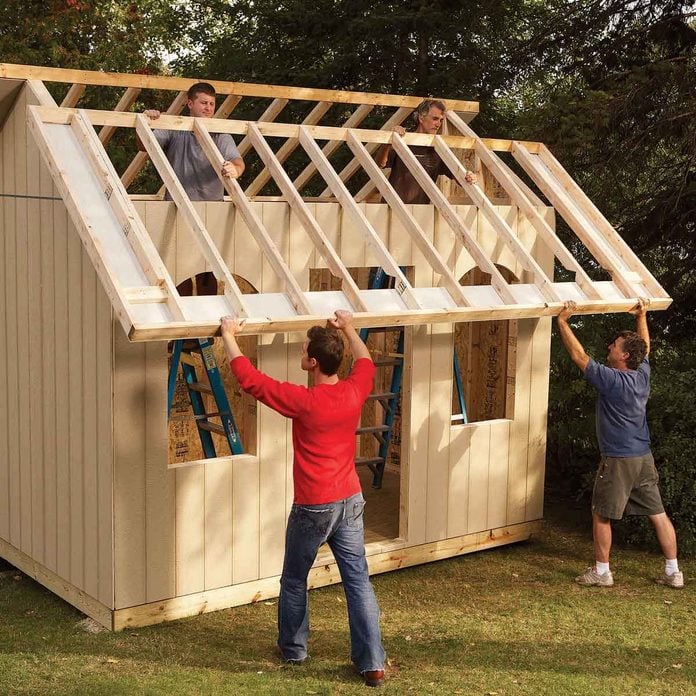
Lift the Roof into Identify
- Slide the roof panels upwards the roof until the bird's-mouths drib over the top plate of the wall.
- Make sure the 2x4 ridge is perfectly aligned with the peak of the wall.
- Secure the roof panels with a pair of toenails through each bird'due south-mouth into the peak plate of the wall.
- Complete the roof framing by nailing the 2x4 ridges together and adding two 2x4 collar ties, 4 ft. apart.
Pace nine
Mark the Gable End Trim for the Brackets
- Start past cutting the gable terminate trim a picayune long and cutting the angle on the top.
- Tack information technology up parallel to the end rafter and mark for the bracket notch.
- Pro tip: Mark rather than measure for the notches. Information technology'south faster and more accurate.

Footstep 10
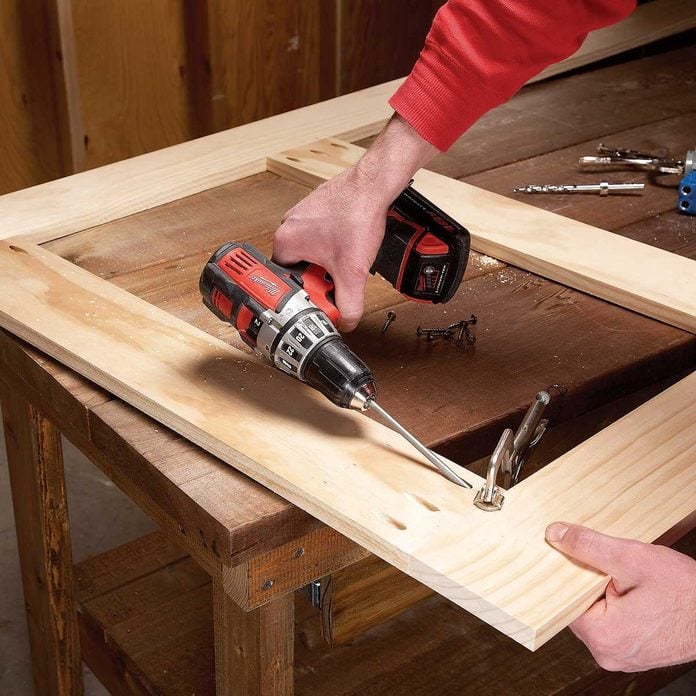
Assemble the Door Frames
- Build two frames.
- Mucilage and clamp them together to brand a ane-1/two-in.-thick door.
- Use pocket screws to assemble each frame.
Stride 11
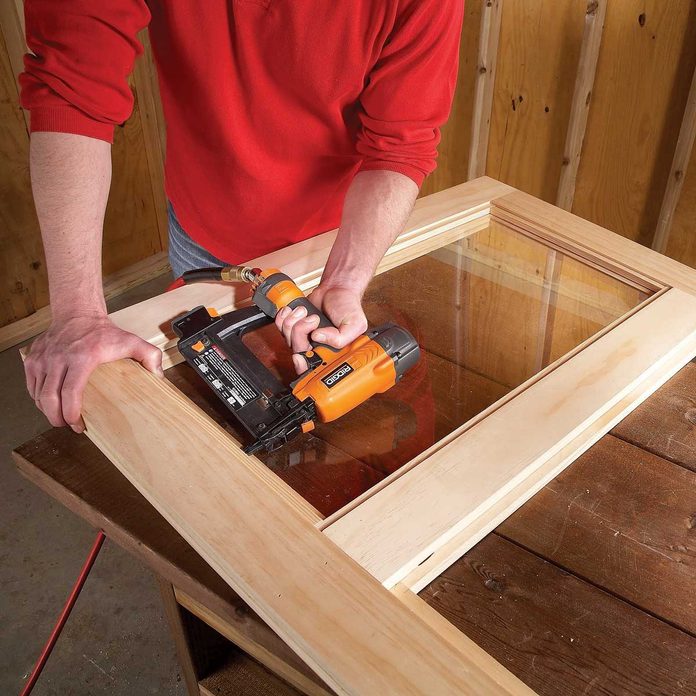
Install Woods Stops to Concord the Plexiglas in Place
- Ready the plywood and Plexiglas insert into the recessed area on the back of the door.
- Boom wood stops around the perimeter to hold them in place.
Step 12
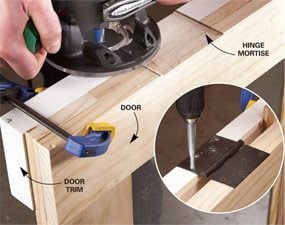
Route the Door Hinges
- Eliminate measuring mistakes by clamping the door and trim together before routing for the hinges.
- Brand certain the trim piece extends i/8 in. above the superlative of the door before yous clamp it.
Pace 13
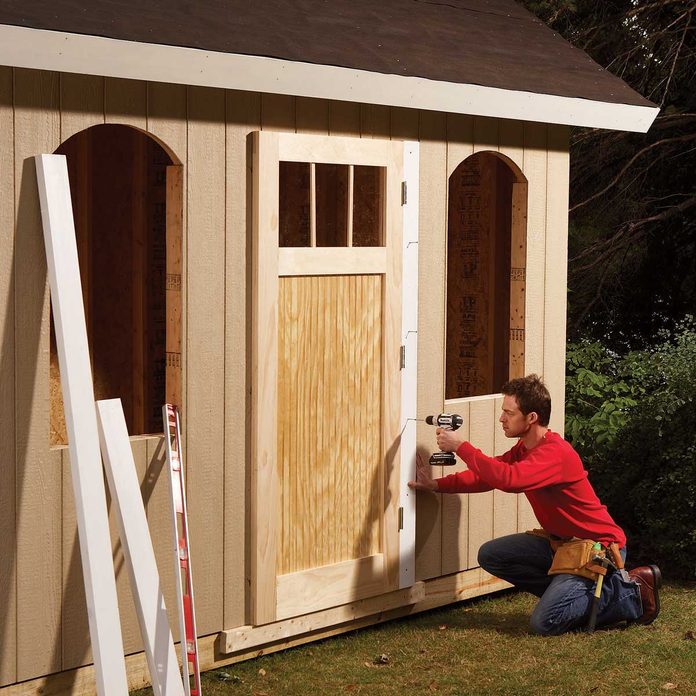
Attach the Door Trim
- Center the door on the opening and screw through the trim to attach it.
- Support the door with a temporary 2x4 screwed to the platform.
- Attach the opposite side trim and finally the top.
Step xiv
Build the Door
- The door consists of two layers of 3/iv-in.-thick boards that overlap at the corners to add strength. Rip 1x6 boards to 4-1/2 in. on a table saw for the exterior layer
- Complete the door frame. And then cut the iv 10 8-ft. grooved plywood to fit the lower recess, and cut a piece of 1/4-in. acrylic sheet to fit the upper recess. Secure the plywood and acrylic sail with 1/2-in. x 1/2-in. moldings nailed to the inside. Sand the edges of the door flush.
Stride 15
Hang the Door
- If yous accept a router, employ a hinge-mortising fleck (or directly bit) to cut the hinge recesses. Otherwise, apply a abrupt chisel.
- An easy way to mark and cut matching hinge recesses in both the door and the trim is to clamp the trim aslope the door, making sure it extends 1/8 in. beyond the top of the door. So mark the hinge cutout on both the door and the trim at the same time.
- Spiral the hinges to the door and trim.
- Mount the door to a 1-1/two-in.-thick trim piece and and so spiral the trim to the wall.
- Stop the door installation by adding the top and side trim pieces.
Footstep 16
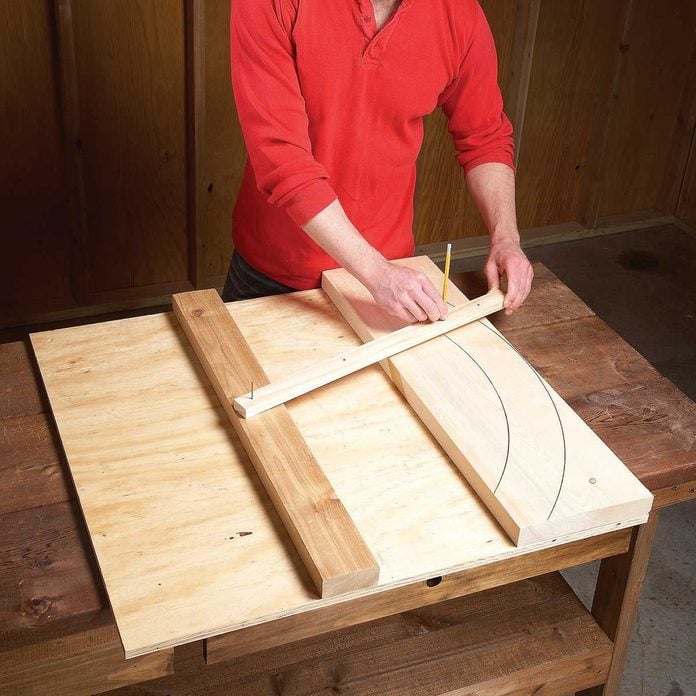
Mark the Window Arches
- Mark out the biconvex window trim using a elementary trammel.
- Employ the same setup for marking the curved 2x10 header and the curved subclass support.
Step 17
Mark the Angled Cuts on the Side Trim Pieces
- Marker and cut the side trim pieces.
- Then fix them in place on the elevation piece to marking the angled cuts.

Step eighteen
Rout the Back of the Window Trim
- Assemble the window frame with pocket screws.
- Rout a recess in the dorsum for the acrylic canvass.
Step xix
Install the Windows
- Rest the window on the temporary 2x4 and screw it to the wall. Eye the window on the opening before driving the screws.
- Cut the side pieces.
- Set the side pieces in place over the summit of the header and marker the angled cuts.
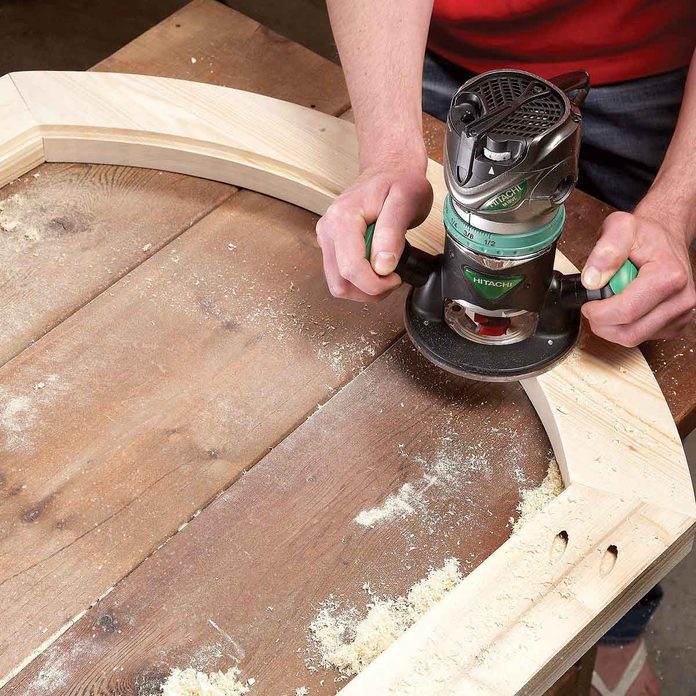
- Finish the curved trim slice past first cutting the angles on each end, and and so sawing the curves with a jigsaw and sanding them smooth. Use the marking jig to lay out the curved caryatid, too.
- Cutting the sill piece and assemble the windows with pocket screws.
- Using a router with a 3/8-in. rabbet bit, rout a three/eight-in.-deep recess on the back of the window to receive the 1/four-in. Plexiglas acrylic sheet.
- Prepare the window frame, recessed side down, over a slice of acrylic sheet and trace the shape with a permanent marker.
- Cut the curve with a fine-tooth jigsaw blade and the direct sections with a fine-tooth blade in a table saw or circular saw.
- Prime and paint the window and let it dry.
- Then employ a thin bead of clear silicone in the recess and embed the acrylic sheet in it. Secure the acrylic sheet with glazing points. Let it set upward overnight.
- We cut the filigree pieces from iii/4-in. ten ane/2-in. parting cease and glued them to the acrylic with clear silicone caulk.
- A temporary support makes it simple to install the window. Level a 2x4 and screw it to the wall two in. below the window opening. And then rest the window on the 2x4 and middle it in the opening before driving screws to secure it. Use caulk to fill the gaps left by the grooved siding.

Step xx
Install the Exterior Trim
- Mount the brackets.
- Line up the outside edges of the lower brackets with the face of the siding, push them tight to the soffit and screw them to the wall.
- Center the top bracket on the peak and push it tight to the soffit.
- Starting with the pieces that go under the brackets, wrap the corners with the corner board.
- Overlap the front corner board onto the side corner lath.
- Get ready for roofing by adding the fascia boards and shingle molding. Notch the fascia boards to fit around the brackets. Keep the 1x2 shingle molding flush to the top of the roof plywood.
- Roof, stain and paint the shed
Step 21
Shingle and Stop
- Complete the shed by installing shingles and finishing the exterior.
- Prime number and pigment the doors and windows before installing them, then you only need to caulk and fill nail holes earlier rolling an additional coat of paint onto the flat surfaces.
- The LP SmartSide panel siding, the composite fascia and corners, and the fiber cement soffit were all pre-primed and required just two coats of paint to finish.
Originally Published: June 05, 2020
richmondsellonbeebot.blogspot.com
Source: https://www.familyhandyman.com/project/how-to-build-a-cheap-storage-shed/
Post a Comment for "How to Draw Plan to Put Up a Shed 4x6"